New exciting BookDrive Capture 4 is released. Recommended for all users.
January 25, 2011 on 5:51 pm | In General | No CommentsWhat’s new?
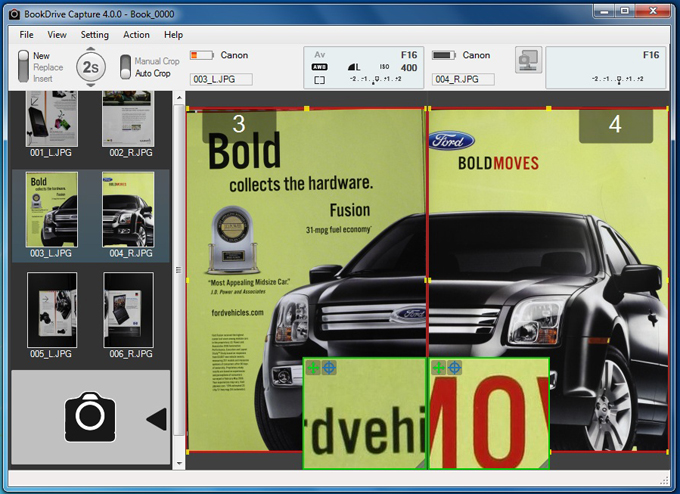
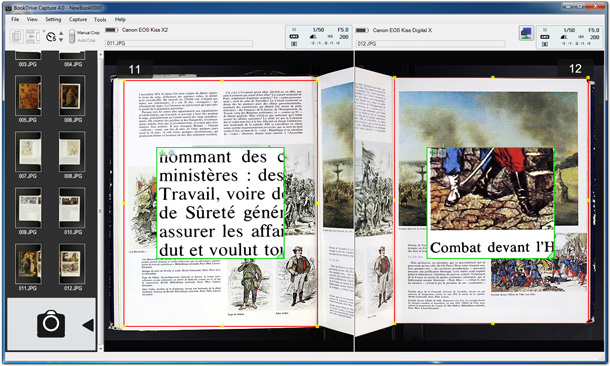
- Redesigned user interface
- New theme
- Instant rotate
- Auto crop and Manual crop mode
- Better support for the Auto Capture Switch
- The capture button area is now clickable
- Magnifying area can be resized and repositioned
- Added ability to shoot single left or right page anytime
Screenshot:
BookDrive Capture 4.0 can be download here.
New BookDrive Capture 4 Beta with new functionality such Instant crop, Instant rotate now available. Download here.
January 10, 2011 on 4:05 pm | In General | No CommentsBookDrive Capture 4 Beta release.
http://www.atiz.com/Download/BookDriveDIY/BookDriveCapture4/BookDriveCapture_4000Beta.zip
Version history:
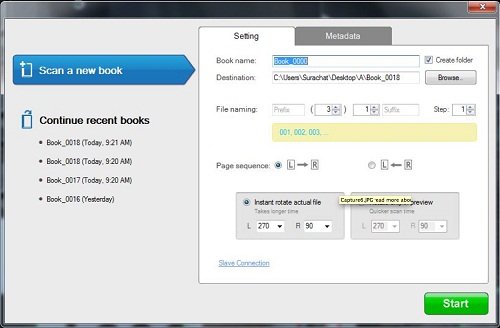
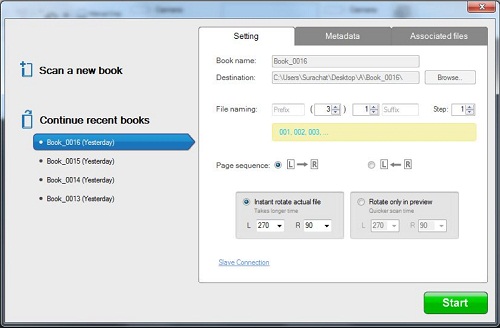
- New Start Up User Interface
- Scan a new book
Instant rotate functionality is now available in Capture.
so users will now have rotate and crop all done and the images are ready to use within Capture.
- Easier to continue recent books
Redesigned interface to make it easier for the users.
- Instant rotate setting
- Metadata
- Instant rotate actual files
- Magnifying area
- The magnifying area is now resizable and can be repositioned anywhere.
Magnifying area can be repositioned anywhere (so that it doesn’t block your view) and resized smaller and larger to match user preference and screen size.
- New darker theme
Thumbnail column in the left is painted dark gray to accentuate the scanned images.
- New “Auto crop” mode for use with the Auto Capture Switch.
You will see the switch to select between “Manual Crop” or “Auto Crop” mode. Auto crop is as the name specified, the program auto crops every page where the red marker is set. You will end up with ready-to-use files. Gone is the extra unused black space.
For BookDrive Pro customers, or customers with Auto Capture Switch, we recommend you turn on the “Auto Crop” mode.
- Added support for Canon EOS 60D
- Simpler action menu
How to set focus and make images sharp?
January 7, 2011 on 5:30 pm | In General | No CommentsUse Manual Focus
In the past, we have recommended customers to use AF (Auto Focus mode), but actually it’s better that you scan in MF (Manual Focus mode) so that the sharpness is consistent on every page, and you don’t have to re-shoot an image, or have focus failure when dealing with blank pages.
The depth of field that we normally use (around F5.6) actually give a depth of wield wide enough to cover the varying distance of camera to book.
As long as book thickness (or more precisely the varying of distance between camera and book) doesn’t go above the depth of field (the calculation here shows about 3.3 inches), the image should still be in focus and considered sharp from first to last page.
HOW TO
1. We only need to set the proper focus at first. Let’s set the camera lens to AF temporarily. AF will help us lock focus properly.
2. Then open the book and turn the pages to somewhere in the middle. (because for the setting we normally used, the depth of field will cover around 3.3 inches. Around 1.6 in front of subject and 1.7 behind subject.)
Half press the shutter button so you hear the beep of camera, which means it can now lock focus.
3. Switch camera lens back to MF.
4. Now, try shooting the cover page (check the preview if you are happy with the result or not. The magnifying area will greatly facilitate this task).
If the test shot looks good, then you can proceed with scanning the entire book.
As we are relying on MF mode, whether a page to scan is blank or not, no longer affects us.
If the user is meticulous, he may want to re-adjust focus again every 300 pages (as it approaches the edge of depth of field sharpness).
(In our case, a 2000 page-phonebook, we only set focus at first and never readjust, and all the pages still turns out sharp)
5. You may consider putting some kind of scotch tape and stick it to the lens itself to make sure that the lens focus ring not become loose and change the focus by itself gradually during the scanning without us knowing.
Sometimes a lens’ focus ring can become loose and move itself a little bit as we lift the glass up and down and there’s lots of vibration and impact on the camera. So locking it with the scotch tape is a good practice of ensuring same focus throughout the session.
Visit Atiz at ALA 2011 Midwinter at the San Deigo Convention Center, Jan 7-11, 2011
January 7, 2011 on 1:47 pm | In General | No CommentsAtiz is participating in the 2011 ALA (American Library Association) Midwinter Meeting in sunny San Diego, CA at the San Diego Convention Center from January 7-11, 2011.
Meet us at booth 1448.
See you there!
For more info visit this link.
